Showing posts with label skirts. Show all posts

Sunday, April 14, 2013

High Waist Tulip Skirt

I am really into skirts this month. Looking back I should have done a whole month tribute to skirts but random skirt posts will have to do. I found this pattern at Walmart for around $3. I love the high waist and the big pockets are really fun too.
 

This skirt was so easy to sew up. It took me from start to finish in under an hour.It is hard to tell but the print is actually small tulips falling in different directions.


 This is a great summer skirt, easy cotton and comfortable. One of the many skirts I will share over the next few weeks.

Friday, March 29, 2013

Basic Skirt Tutorial

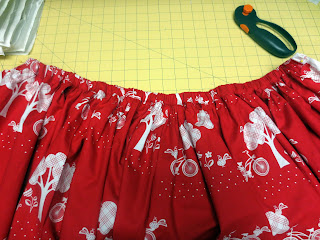
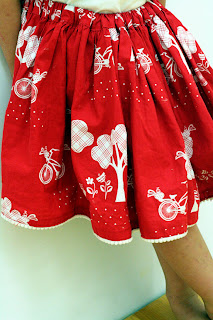
Summer is coming and with the temperature rising my daughter is in need of some easy skirts to stay cool. A basic elastic waist skirt is the perfect solution and so quick to make. You can make it for any girl 12 months to adult for just about 1 yard of fabric. I wanted to make a really fluffy skirt so mine is much fuller than needed.

Here are the instructions:

-1 yard fabric (44" wide)
-1 inch elastic
-matching thread

1. Cut two panels of fabric on the fold for a total measurement of 44" long each. Here is a quick width chart:
  • 12 months: 10"
  • 2T: 11"
  • 3T: 12"
  • 4T: 13"
  • 5T: 14:
Then it tapers off. Measure your model for the exact length adding 1 inch for the hem.  (For an adult I would cut the skirt 22" wide).

Cut your elastic to the width of the waist.
  • 12 months: 17" long
  • 2T: 18" long
  • 3T: 20" long
  • 4T: 22" long
  • 5T: 24"long
and so on

Cut a third panel 4" wide x 44" long. (waist panel) Fold in half WST and press. Open panel and press one side of the waist band 1/4" towards the middle WST.

2. The two larger panels together at one of the side seams RST.
Press the seam open. Sew a gather stitch along the top of the panels leaving the threads long for gathering. Then sew a second gather stitch right next to the first stitch.
 Pull the threads and gather the fabric to match the length of the smaller waist panel.
3. Open the waist band paenl and with RST pin the skirt panel to the waist band panel (make sure the pattern is the correct direction if that is an issue). Sew the gathered panel to the waist band using a 1/4" seam. Open and press.
4. Flip the waist band panel over the raw edge of the skirt panels on the fold. This will make a casing for your elastic. Make sure that your 1/4" fold is still folded. Pin in place and top stitch to your skirt.


5. Thread your elastic through the casing securing at each end, I use a safety pin for this part. With RST match the sides of the skirt and pin in place all the way through the waist band. Sew together starting at the bottom and back stitch at the waist band.
6. Turn the bottom of your skirt under 1/4" inch, press, then turn another 1/4", press. Top stitch in place.

Now you are done. You can add embellishments to the bottom or pockets to the front. I added small poms to the bottom of this skirt.


*if you don't want such a full look you can reduce the length of your panels.
Tuesday, January 8, 2013

fabric find Tuesday #13

As part of my goals this year I plan on sewing more for myself. I don't tend to like to sew for myself  because it takes longer, it is much harder (women have curves), and honestly I am not a fan of pattern sizing (a regular size 4 can be as much as a size 10 in patterns, ahhh). But I do think that when you sew for yourself you can make a dress or skirt however you want and the style that flatters your body the best. For example maybe you have large hips and a small bust, a 50's style dress would be perfect with a tight bodice and a full skirt.

I have what I like to call an upside-down triangle shape. I have a large chest and very skinny hips. So finding dresses or skirts that look good on me can be a challenge. I know that I need a defined waist and a supportive bodice. So many times I like to mix and match the patterns to make something that will look great on my figure.

So what does that have to do with fabric? I found this great linen on fabricworm that I plan on making my first piece of the year for myself. It is a golden yellow color with white scallops.

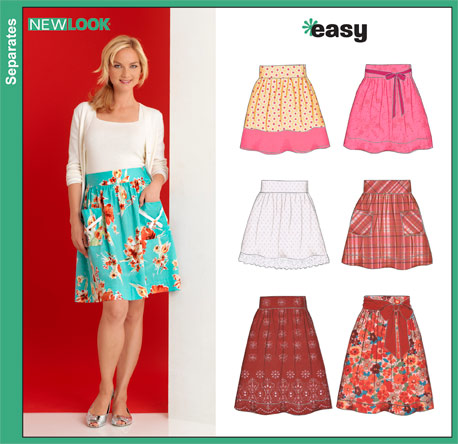
I want to make a pencil skirt. Something along these lines with a high waist and a thick waistband. Maybe pockets too, every mom needs pockets.


Now to find the perfect pattern...any ideas?

Thursday, September 27, 2012

Molly School Girl Pattern Test

There is nothing more fun than trying to take pictures of a wiggle three year old. Elizabeth used to be my star model but lately she is more about running from the camera than actually looking at it. I guess that is what I get for having a lens in her face for the last 3 years straight.

Anyways, this week I tested a pattern for Peek-a-boo pattern shop. Her newest design is the Molly school girl outfit. It is so adorable. I love the piping, I love the suspenders, and I love the idea of separates for a change of pace. It is the perfect fall transition outfit for any little girl and it comes in sizes 3 months to 8 years old.

I used brown corduroy for the skirt and a Moda print for the top. I think the pattern of the fabric totally fits the style of the top.


I don't know what it is about making little girls clothing but I can't resist creating new things for my daughter. Even when I have other projects I should be working on first. Oh well, they always turn out adorable.


Monday, June 18, 2012

Adele Skirt Pattern Review-Peek-a-boo pattern shop


One more Peek-a-boo pattern review just to get you motivated and enter the GIVEAWAY which ends on Wednesday. The Adele skirt. Easy, quick, comfy, and cute. My kind of summer skirt in the hot months to come. It is a 3 tiered skirt with a yoga band waist. I love the yoga band because it is stretchy and won't dig in anywhere. I added my own little touches with the ruffle trim and red bow. Each ruffle took less than 1/4 yard of fabric. You could use your scraps if you have big scraps.


I think someone was having fun prancing around in this little number!

Saturday, June 9, 2012

Maxi Skirt, Maternity Edition

A growing baby belly = expanding waistline. Which means time for some new additions to the wardrobe. I have a lot of maternity cloths from my previous two pregnancies but there is something about a new clothing item that makes a person feel good. So I decided to try to make myself a maxi skirt. The perfect summer bottom. I found some amazing jersey knit in plum at Joann's and just went for it.


I started by using a maxi skirt that I already owned. I used it as a guide to cut out the body of the skirt. Then I added a strip of fabric for the waist (yoga waist bands are the best during pregnancy). It was 10" wide and the length of my waist on the skirt body. (FYI: 16" waist, 40" long). You will need 2 body pieces and 2 waist band pieces.


Next with right sides together pin and sew along the sides of the skirt using a straight stitch.

 
 Now take your two waist band pieces and sew together at the sides using a zig zag stitch for stretch. This will create a circle.


 Fold your circle in half with wrong sides together to make a thick circle.
 Place the circle over the top of the skirt body with the skirt body wrong side out. Pin in place matching up the side seams. All the raw edges should be matched up.

 Sew using a zig zag stitch all around the top. You could also use elastic thread for extra stretch (like in my case to make room for an expanding belly).
Press all your seams open. Then at the bottom of the skirt turn up the bottom 1/2", press, and turn again another 1/2". Sew your hem in place (I used a zig zag stitch just in case).  Turn your skirt right side out, flip the waist band over the top, and enjoy the comfort of a cute new skirt.