Today's post is a wonderful Fun Find Friday tutorial coming to your from The Crafty Women. Cristine has so many great ideas and tutorials on her website.
Check out this fantastic hutch remake
And this adorable J.Crew knockoff
Today she is proud to share a great jersey rug that would be perfect in any room.
My name is Christine from the Crafty Woman.
I am a craft addict.
Feels good to be in a place that understands me!
This tutorial proves my addiction and that for once, addiction can be a good thing.
WARNING: this project takes time!
It took about 4 hours to cut all the strips.
It took about 30 hours to tie it.
Totally worth doing again!I love how thick and soft this rug is!
Here is how to do it:
1 latch hook rug canvas 36 by 60 is $9.99 at Joann's
7-9 yards of jersey fabric or lots of t-shirts.
rotary cutter and mat
Fold your fabric in half length wise, twice.
Cut into long 1 inch strips.
You will then cut each long strip into 4 inch strips.
I made my rug 18" by 60" using up 9 yards of fabric (or 4860 strips).
If you don't tie yours so close together, you'll use a lot less.
If you don't tie yours so close together, you'll use a lot less.
But I wanted mine really thick.
If you opt to use t-shirts, you can dye them after cutting for uniform color.
Dying and washing them will result in curled edges.
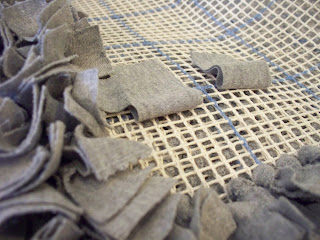
Fold each strip in half.
You could use pliers or a latch hook for pulling the strips through,
I found pliers were faster and easier on my hands.
Feed your hook/pliers through your hole and grab folded edge of strip.
Pull through about 1/4 of the way.
I then pushed the ends through the little loop I made.
And pulled tight.
I found it was faster to pull a row through
Then go back and tie them.
The canvas has squares which help keep track of where you left off.
From the back you can see how I went every other space,
every other row.
After hours and hours of that....you're done! Almost.
Now it is time to bind your rug.
Peel your binding from it's paper as you go.
Now it is time to bind your rug.
Peel your binding from it's paper as you go.
Fold under raw edge of rug and lay binding over it.
 |
| {note: I used masking tape around my raw edges while I was working. This kept the edges from fraying!} |
Pressing firmly, iron to seal binding.
Check bond and press again if needed.
Try to get as close to the edge as you can.
Put wherever you feet need something cozy to step on.
Put wherever you feet need something cozy to step on.
Greyhound approved.
{I get asked a lot about my dogs so if you are wondering:
Quigley is a retired racer we rescued.
He still can run 43 mph.
But would rather sleep on my rug all day.
Unless our female greyhound, Sadie, is on it.}


1 comment:
I've been wanting to make one of these for awhile and this has absolutely encouraged me to get moving on the project! It looks very time consuming but turned out beautiful!!
Post a Comment