A few months ago the sweet girls at
Fancy Road House invited me to a local blogger meetup. I'm so glad I went because I met some really great local bloggers and had so much fun making a burlap wreath. You can read their recap of the event
here. I just realized I never shared the details of my fun night...expect a post all about it shortly!
Today I finally finished embellishing my wreath and hung it on my front door.
Prior to this wreath getting hung today, our door was boring. I didn't have a wreath hanger that fit this door because of the curve. This is our first curved door and I was clueless what to do about a wreath hanger.
I noticed a pretty wreath on my neighbor's door a couple of weeks ago. I asked how she hung the wreath and she told me about the
removable 3M hangers. I picked one up with a 40% off coupon at Michael's last week.
I've been wanting to add vinyl to our door for awhile so I figured I might as well get that done today too. I used my Cricut to cut out "Welcome" in red vinyl.
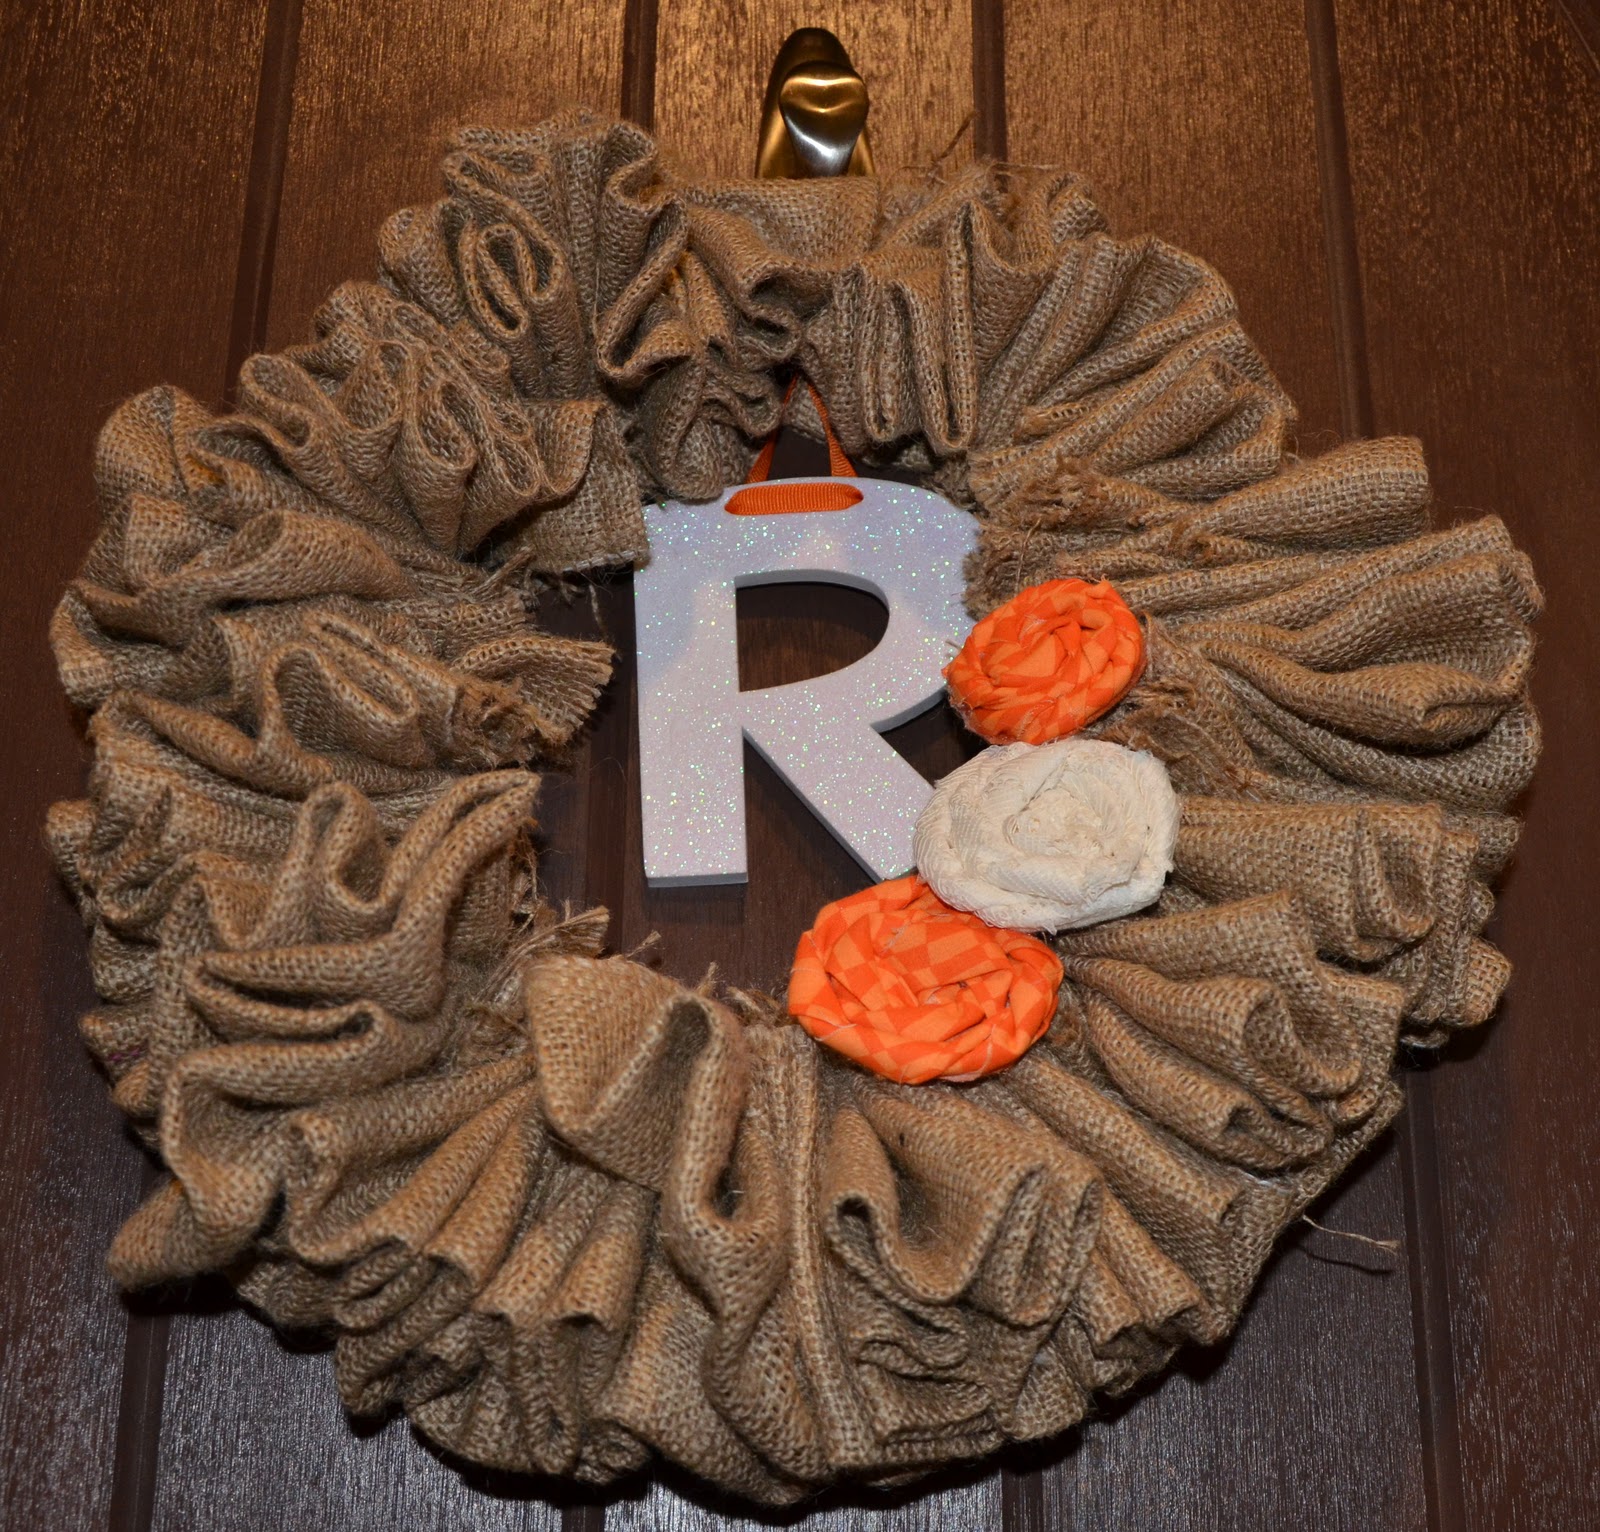
I pulled out the burlap wreath and thought about just putting it on the door with out adding any embellishments. Isn't it pretty?
I finally talked myself into adding some color to the wreath. First I used a foam letter (our initial) from Target.
I made it cute by changing the ribbon.
Then I used fabric scraps to make a few rosettes. I had a difficult time deciding on a color because I didn't want the wreath to be specific to one season. I ended up putting velcro on the back of the rosettes so they could be changed through the year.
The orange and white looks perfect for Fall!
But I'm most excited to change them to something red and green in December! The velcro will make it a quick change!
My front door finally looks welcoming!
I'm linking this post
here.


8 comments:
The velcro is a great idea! Looks great!
Your wreath is so cute! I love it. I thin it looks great with the embellishments you put on it.
I found you through Get Your Craft On at Today's Creative Blog and am your newest follower. Cheers! Carissa from Carissa's Creativity Space
Alright! This is awesome! Burlap is my favorite material to work with! This post is so informative and I think my subscribers would really enjoy reading this. I would love for you to come share it at Frugal Days, Sustainable Ways on Frugally Sustainable today. And, I really hope that you will put Frugal Days, Sustainable Ways on your list of carnivals to visit and link to each Wednesday! Here’s the link: http://frugallysustainable.blogspot.com/2011/11/frugal-days-sustainable-ways-1.html
Warmly,
Andrea @ Frugally Sustainable
Here's the link: http://www.frugallysustainable.com
Oh - your wreath is lovely! Burlap is one of my favorite materials to work with. I like how you've made it possible to change it out for all the seasons, great idea.
I'd love to invite you to share this at my Thingamajig Thursday party going on now...http://radcrafter.com/2011/11/thingamajig-thursday-party-3/
Alida
You made it:) Thank you so very much for linking up to Frugal Days, Sustainable Ways:) I'm so happy to "meet" you! I am totally loving your blog and your posts! I really hope you make Frugal Days, Sustainable Ways a part of your Wednesdays! And keep the great posts comin'
Very sincerely,
Andrea @ Frugally Sustainable
How stinkin smart is that! Love the velcro.. makes it so much easier to change. Genius idea :) I would love for you to share this on my friday link party too!
Thanks for linking your wreath up to my Friday party.. hope youll come back this week too! Oh.. and dont forget to enter my TinyPrints giveaway :)
Friday link up and features!
Thank you so much for sharing on Thingamajig Thursday! Hope to see you again this week.
Alida
radcrafter.com
PS...I'm your newest follower.
Post a Comment