Welcome to the first week of our INSPIRE US series. We will be making several items that are just for you. Sometimes as mothers and crafters it is time for us to make some special for ourselves. We will have a few special guest hosts popping in next week so stay tuned and enjoy all the creations. We hope something will inspire you!
When I found out our series would be based on crafts and projects for us I was flooded with ideas. There are so many great crafts and sewing projects out there. I wanted to make sure that I created a variety of projects that anyone could make. So I browsed through my jewelry looking for inspiration when I came across these.


Old bangles that I never wear. They are still in great condition physically just not aesthetically pleasing. So what to do with them....recover them.
I toyed with paper, fabric, ribbon, yarn, lace. There are so many options. I decided to go with yarn for the large one and ribbon for the smaller ones. Here is what I did.
For the thin bangles:
I have a lot of ribbon in my stash so I tried to decide between this thin green and an orange scallop. I went with the orange. I used about 3ft.
 I wanted the bangle to be thicker so I glued the three thin bangles together using my hot glue gun.
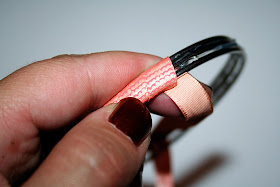
 Then I began wrapping the ribbon around the bangle. Make sure it is really tight and straight to avoid wrinkles.
 Once the whole thing is covered cut the ribbon off and glue the end in place.
Finally I put mod podge all over the bangle to keep the ribbon in place and give it a finished look.

 For the thicker bangle:
For this project I used a tarnished bangle, mustard yarn, and gray ribbon. (Word to the wise use yarn that does not fray or ball up. I don't use yarn a lot so mine turned out really fuzzy.)
 I began by tapping the mustard yarn to the inside of the bangle. Then I wrapped it around the bangles making sure to pull tight and place each yarn wrapping close to the previous one.
 I glued the end in place.
 I think the bangle is really cute like this and the yarn is great for fall. I really like mustard and gray so I went 1 step further. I began wrapping the gray ribbon around the bangle in diagonal lines and then criscrossing the other way.
 I glued the end on the inside. (It doesn't look as nice as I would like but nobody sees the inside right?)
Here is what the finished product looks like.

Two new pieces of jewelry. Total cost=$0!


Great idea! I love the yarn one. Using hemp rope might give it the same effect without the fuzz. This will be a project for me this weekend! :)
ReplyDeletesuch a cute idea!
ReplyDeleteI like to invite you to share this at my FIRST EVER linky party :) @ http://www.jaqsstudio.com/2011/10/jaqs-studio-first-ever-linky-party.html
-Q
They looks great - saw you on linky party and now gfc following you,and also pinterest following Karima www.karimascrafts.com
ReplyDeleteVery fun, my daughter would love these.
ReplyDeletelove this! so thrifty! i love the colors. great job!
ReplyDeletei would love for you to come link up this or any other amazing project at my creativity party going on right now!
letbirdzfly.blogspot.com
thanks so much for sharing!
The yarn one is my favorite!! Thanks for linking to Things I've Done Thursday.
ReplyDeleteMelanie
bearrabbitbear.blogspot.com
These are awesome...fun for big girls or little girls alike! I'd love for you to link them up here:
ReplyDeletehttp://oneartmama.blogspot.com/2011/10/fall-craft-challenge-5-kids-craft-or.html
Pretty-love the yellow one! Thanks for linking up to Share the Love Wednesday; hope you'll be back this week!
ReplyDeleteMary